什麼是 LinkFree 及其架設優點? LinkFree 是一套開源的 LinkTree 替代方案 ,旨在協助使用者建立完全自主掌控的 個人傳送門 。其核心定義在於:利用簡單的 靜態網頁設計 技術(HTML/CSS),將 Instagram、Facebook 及 YouTube 等多個社群連結整合在單一網頁中。這份 LinkFree 製作指南 的優點包含:1. 完全免費 :透過 Github Pages 部署 ,無需負擔月費;2. 高度客製化 :可自由修改原始碼,打造獨特的主覺設計;3. 提升個人品牌行銷 :擁有專屬網址且不帶第三方商標。對於略懂網頁技術的開發者,這是實現高效 個人傳送門架設 並優化數位足跡的最佳實踐路徑。
什麼是 LinkTree:社群連結的整合工具 LinkTree 是一頁傳送門,透過 IG 的個人檔案連結來做相關行銷與各平台的串聯。
透過 LinkTree 整合 Facebook、Line、Youtube、TG、網站和活動訊息等等。
透過這個免費的服務就可以輕鬆製作,想要交個女朋友首先要讓很多女生可以認識你。
所以就讓我們來看看該怎麼製作個人的靜態的 LinkTree 頁面吧。
什麼是 LinkFree:開源的個人傳送門解決方案 LinkFree 是一套開源的解決方案,畢竟就是寫個網頁,如果略懂略懂 HTML、CSS、JavaScript 的話,小編還是相當推薦自己來製作看看的,底下附上小編的 LinkFree 頁面給大家:
https://linyencheng.github.io/LinkFree/
接下來的範例主要會以底下這個 Template 來解說
https://github.com/MichaelBarney/LinkFree/tree/master/Templates/3D%20Theme
作者所提供的 Demo 頁面
https://michaelbarney.github.io/LinkFree/Templates/3D%20Theme/
Repo
https://github.com/MichaelBarney/LinkFree
這是最終預覽的畫面
LinkFree 頁面原始碼解析:HTML、CSS 結構與樣式 本節將深入解析 LinkFree 頁面的原始碼,了解其基於 HTML 和 CSS 的結構與樣式,幫助您自定義個人化的傳送門頁面。
1
2
3
4
5
6
7
8
9
10
11
12
13
14
<!DOCTYPE html > <html > <head > <meta charset ="utf-8" /> <meta http-equiv ="X-UA-Compatible" content ="IE=edge" /> <meta name ="viewport" content ="width=device-width, initial-scale=1" /> <title > </title > <meta name ="description" content ="" /> <link rel ="stylesheet" href ="" /> </head > <body > <script src ="" async defer > </script > </body > </html >
加入需要引入的資源,這裡主要加入字形、Icon 1 2 3 4 5 6 7 8 9 10 11 12 13 14 15 16 17 18 19 20 21 22 23 <!DOCTYPE html > <html > <head > <meta charset ="utf-8" /> <meta http-equiv ="X-UA-Compatible" content ="IE=edge" /> <meta name ="viewport" content ="width=device-width, initial-scale=1" /> <meta name ="description" content ="" /> <link rel ="stylesheet" href ="" /> <link href ="https://maxcdn.bootstrapcdn.com/font-awesome/4.7.0/css/font-awesome.min.css" rel ="stylesheet" /> <link href ="https://cdn.jsdelivr.net/npm/remixicon@2.5.0/fonts/remixicon.css" rel ="stylesheet" /> <link rel ="stylesheet" href ="style.css" /> <title > 3D Theme</title > </head > <body > <script src ="" async defer > </script > </body > </html >
加入各部分的內容 首先加入圖片跟標題
1 2 3 4 5 6 <img alt ="User Photo" id ="userPhoto" src ="https://1.bp.blogspot.com/-v4Yi0oSR0-c/X1YRNalQZLI/AAAAAAAAA6U/xMnEQKBDgPgKFXQONoHthgMbQ91QURBlACLcBGAsYHQ/s0/technopreneur.jpg" /> <span id ="userName" > 3D Theme by Farell Faiz</span >
加入相關連結
1 2 3 4 5 6 7 8 9 10 11 12 13 14 <div id ="links" > <a class ="link" href ="#yourLink" target ="_blank" > <i aria-hidden ="true" class ="fa fa-camera" > </i >     Photography Submission</a > <a class ="link" href ="#yourLink" target ="_blank" > <i aria-hidden ="true" class ="ri-discord-fill" > </i >     Discord Server</a > <a class ="link" href ="#yourLink" target ="_blank" > <i aria-hidden ="true" class ="fa fa-video-camera" > </i >     Zoom Webinar Room</a > </div >
Footer 加入社群連結,並且使用適當的 Icon
1 2 3 4 5 6 7 8 9 10 11 12 13 14 15 16 17 18 19 20 21 22 23 24 25 26 27 28 29 30 <div class ="footer" > <a href ="#yourLink" target ="_blank" > <i aria-hidden ="true" class ="fa fa-globe media" style ="line-height: 38px; font-size: 10px;" > </i > </a > <a href ="#yourLink" target ="_blank" > <i aria-hidden ="true" class ="fa fa-envelope-o media" style ="line-height: 38px; font-size: 10px;" > </i > </a > <a href ="#yourLink" > <i aria-hidden ="true" class ="fa fa-comments-o media" style ="line-height: 38px; font-size: 10px;" > </i > </a > <a href ="#yourLink" target ="_blank" > <i aria-hidden ="true" class ="fa fa-instagram media" style ="line-height: 38px; font-size: 10px;" > </i > </a > </div >
最後結果 1 2 3 4 5 6 7 8 9 10 11 12 13 14 15 16 17 18 19 20 21 22 23 24 25 26 27 28 29 30 31 32 33 34 35 36 37 38 39 40 41 42 43 44 45 46 47 48 49 50 51 52 53 54 55 56 57 58 59 60 61 62 63 64 65 66 67 68 69 70 71 72 73 <!DOCTYPE html > <html > <head > <meta charset ="utf-8" /> <meta http-equiv ="X-UA-Compatible" content ="IE=edge" /> <meta name ="viewport" content ="width=device-width, initial-scale=1" /> <meta name ="description" content ="" /> <link rel ="stylesheet" href ="" /> <link href ="https://maxcdn.bootstrapcdn.com/font-awesome/4.7.0/css/font-awesome.min.css" rel ="stylesheet" /> <link href ="https://cdn.jsdelivr.net/npm/remixicon@2.5.0/fonts/remixicon.css" rel ="stylesheet" /> <link rel ="stylesheet" href ="style.css" /> <title > 3D Theme</title > </head > <body > <img alt ="User Photo" id ="userPhoto" src ="https://1.bp.blogspot.com/-v4Yi0oSR0-c/X1YRNalQZLI/AAAAAAAAA6U/xMnEQKBDgPgKFXQONoHthgMbQ91QURBlACLcBGAsYHQ/s0/technopreneur.jpg" /> <span id ="userName" > 3D Theme by Farell Faiz</span > <div id ="links" > <a class ="link" href ="#yourLink" target ="_blank" > <i aria-hidden ="true" class ="fa fa-camera" > </i >     Photography Submission</a > <a class ="link" href ="#yourLink" target ="_blank" > <i aria-hidden ="true" class ="ri-discord-fill" > </i >     Discord Server</a > <a class ="link" href ="#yourLink" target ="_blank" > <i aria-hidden ="true" class ="fa fa-video-camera" > </i >     Zoom Webinar Room</a > </div > <div class ="footer" > <a href ="#yourLink" target ="_blank" > <i aria-hidden ="true" class ="fa fa-globe media" style ="line-height: 38px; font-size: 10px;" > </i > </a > <a href ="#yourLink" target ="_blank" > <i aria-hidden ="true" class ="fa fa-envelope-o media" style ="line-height: 38px; font-size: 10px;" > </i > </a > <a href ="#yourLink" > <i aria-hidden ="true" class ="fa fa-comments-o media" style ="line-height: 38px; font-size: 10px;" > </i > </a > <a href ="#yourLink" target ="_blank" > <i aria-hidden ="true" class ="fa fa-instagram media" style ="line-height: 38px; font-size: 10px;" > </i > </a > </div > <script src ="" async defer > </script > </body > </html >
加入 CSS 引用字型並定義變數
1 2 3 4 @import url("https://fonts.googleapis.com/css?family=Karla:400,700&display=swap" );:root { --font : "Karla" , "Karla" , sans-serif; }
設定 RWD 的效果
1 2 3 4 5 6 7 8 9 @media only screen and (max-width : 700px ) { #links { margin-left : 3% ; margin-right : 3% ; } .night_mode { margin-right : 40% ; } }
最終結果
1 2 3 4 5 6 7 8 9 10 11 12 13 14 15 16 17 18 19 20 21 22 23 24 25 26 27 28 29 30 31 32 33 34 35 36 37 38 39 40 41 42 43 44 45 46 47 48 49 50 51 52 53 54 55 56 57 58 59 60 61 62 63 64 65 66 67 68 69 70 71 72 73 74 75 76 77 78 79 80 81 82 83 84 85 86 87 88 89 90 91 92 93 94 95 96 97 98 99 100 101 102 103 104 105 106 107 108 109 110 111 112 113 114 115 116 117 118 119 120 121 122 123 @import url("https://fonts.googleapis.com/css?family=Karla:400,700&display=swap" );:root { --font : "Karla" , "Karla" , sans-serif; } body { background-color : #0a072e ; } #userPhoto { width : 96px ; height : 96px ; display : block; margin : 35px auto 20px ; -webkit-box-shadow : 0px 6px 0px 0px rgba (222 , 218 , 162 , 1 ); -moz-box-shadow : 0px 6px 0px 0px rgba (222 , 218 , 162 , 1 ); box-shadow : 0px 6px 0px 0px rgba (222 , 218 , 162 , 1 ); transition : all 0.15s ; } #userPhoto :hover { box-shadow : 0px 8px rgba (222 , 218 , 162 , 1 ); transform : translateY (-2px ); } #userPhoto :active { box-shadow : 0px 0px black; transform : translateY (6px ); } #userName { color : white; font-size : 1rem ; font-weight : 600 ; line-height : 1.25 ; display : block; font-family : var (--font); width : 100% ; text-align : center; text-decoration : none; } #links { max-width : 675px ; width : auto; display : block; margin : 27px auto; } @media only screen and (max-width : 700px ) { #links { margin-left : 3% ; margin-right : 3% ; } .night_mode { margin-right : 40% ; } } .link { display : block; background-color : #01a79b ; color : #fff ; font-family : var (--font); text-align : center; margin-bottom : 20px ; padding : 17px ; text-decoration : none; font-size : 1rem ; font-weight : bold; transition : all 0.15s ; box-shadow : 0px 6px #007569 ; } .link :hover { box-shadow : 0px 8px #007569 ; transform : translateY (-2px ); } .link :active { transform : translateY (6px ); box-shadow : 0px 0px #007569 ; } #proker { max-width : 300px ; width : auto; display : grid; margin : 27px auto; } .footer { text-align : center; font-size : 1.3rem ; } .footer a { text-decoration : none; } .media { background : #dd5a79 ; width : 38px ; height : 38px ; text-align : center; color : white; margin-bottom : 40px ; box-shadow : 0px 6px #9e4355 ; transition : all 0.15s ; } .media :hover { box-shadow : 0px 8px #9e4355 ; transform : translateY (-2px ); } .media :active { transform : translateY (6px ); box-shadow : 0px 0px #9e4355 ; }
LinkFree Github Pages 部署:免費架設您的個人傳送門 Github Pages Github Pages 部署 LinkFree ,可以讓您輕鬆擁有一個免費且個人化的傳送門 。
使用上就是五個步驟
建立 Repo 將要顯示的靜態頁面 Push 到 Repo 可以在 repo 的頁面按 . 進入網頁編輯模式或是將連結修改成 github.dev 開頭 => https://github.dev/LinYenCheng/LinkFree 專案設定中的 Page 指定 branch 以及資料夾 等待發佈和驗證 詳細圖說可以參考粉絲專頁貼文 。
系列文章導覽 在此系列文章中,我們從基礎的網頁構成出發,逐步深入到後端 API 設計、開發工具、專案架構以及自動化部署。以下是系列文章的導覽:
或者您可以參考 前後端如何和平相處系列目錄 以獲取完整列表。
FAQ:LinkFree 與個人傳送門常見問題 Q1:LinkFree 與 LinkTree 最大的差別是什麼? A:核心差別在於「主導權」與「費用」。LinkTree 是訂閱制服務,進階樣式需付費且數據存在對方平台;而 LinkFree 製作指南 展示的是一種 個人傳送門架設 的開源方案。您擁有網頁的完整原始碼,可以自由定義樣式(CSS),且透過 Github Pages 部署 是永久免費的,非常適合想要建立高品質 個人品牌行銷 的開發者。
Q2:如果我完全不會寫程式,也能使用 LinkFree 嗎? A:LinkFree 雖然是基於 HTML/CSS,但網路上有許多預建好的 Template。您只需要複製程式碼,並將連結(href)與圖片地址替換成您自己的即可。相較於 LinkTree 的拖拉介面,這需要一點點學習,但這也是學習 靜態網頁設計 的絕佳入門專案。
Q3:GitHub Pages 的部署速度快嗎?會不會常斷線? A:GitHub Pages 的穩定性極高,且全球具備 CDN 加速,對於 個人傳送門 這種輕量級網頁來說,加載速度通常比 LinkTree 更好。部署過程通常在 Push 程式碼後的 1 分鐘內就會自動更新。這讓您的 個人品牌行銷 資訊能隨時保持最新狀態。
更多相關文章 本篇 API 系統設計指南全面解析 API 設計的核心原則與實戰方法。內容涵蓋 API 規格文件撰寫、內部審查、早期回饋、效能考量,以及如何避免 Breaking Changes。此外,更提供系統設計面試的實用流程與準備策略,幫助您提升 API 設計能力與職涯競爭力。
想學習後端 API 開發嗎?本篇 Web API 實作解析深入探討 JavaScript (Express.js)、Python (FastAPI) 和 Java (Spring Boot) 的實戰技巧。我們將從 API 規格文件撰寫、Swagger/OpenAPI 應用到各語言程式碼範例,全方位助您掌握後端開發核心。
想深入理解 API 的運作原理嗎?本篇 RESTful API 概念解析帶您從 Request/Response 定義出發,掌握 HTTP 方法與資源導向設計。前 150 字直接回答核心定義,並透過 Swagger/OpenAPI 實例,助您提升前後端協作效率。
想徹底解決 CSS 命名衝突嗎?本篇 CSS in JS 指南深入探討在 React 應用中管理樣式的最佳實踐。我們將解析 styled-components、CSS Modules 與 Facebook 最新 StyleX 的優缺點。前 150 字直接回答 CSS in JS 定義,助您在提升模組化程度的同時做出最佳技術選型。
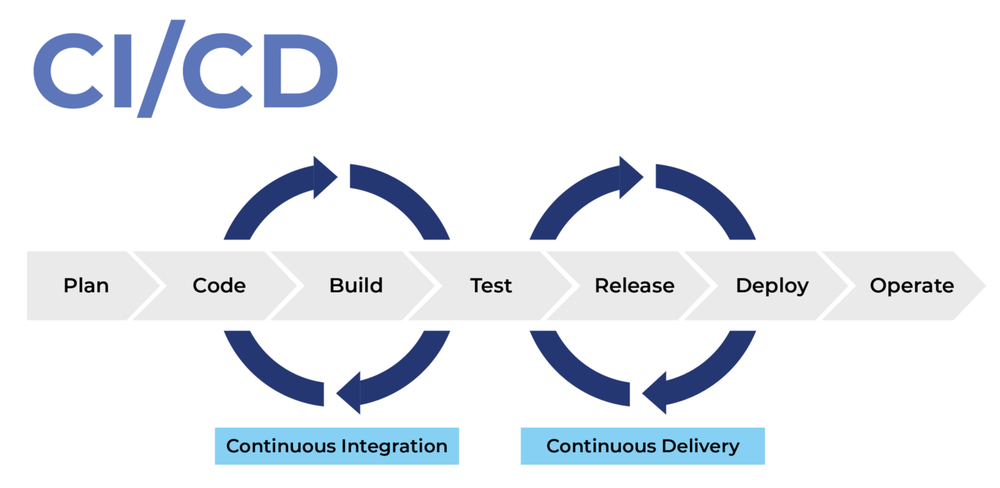
想實現自動化部署嗎?本篇 CI/CD 實踐指南深入解析持續整合 (CI) 與持續交付 (CD) 的核心概念。我們將分享 Jenkins、CircleCI 和 GitHub Actions 的實戰配置,涵蓋 Cron Job 定時工作與自動化發布流程。前 150 字直接回答 CI/CD 定義,助您建構高效的 DevOps 工作流。